
How to build a shuffleboard table? Shuffleboard is an old game, having started in England in the 1400s. Originally called “shove-grout” it involved shoving a “groat,” which was a large silver coin, down the table. While similar to today’s version, shuffleboard has become more formalized, with tables made specifically for the purpose, rather than using whatever table is available.
Special tables are used for two main reasons: to ensure a smooth playing surface and to allow for the painting of the lines and targets on the tabletop. A regulation shuffleboard table, for competition, is 22 feet long, but recreational tables can range anywhere from 9 feet up to the regulation standard.
Any shuffleboard table consists of two basic parts: the playing surface and the table, which holds the playing surface and acts as a boundary, catching pucks that fall off the playing surface for one reason or another.
Traditionally, shuffleboard tables are constructed of hardwoods, such as maple, oak, or mahogany. But it’s also possible to make one out of bamboo flooring, cabinet-grade plywood, or MDF (medium-density fiberboard). The material used for the table itself isn’t as important as that used for the playing surface, which needs to be flat, even, and smooth. However, high-quality materials are often chosen for the table as well, more as a decorative addition, turning it into a quality piece of furniture.
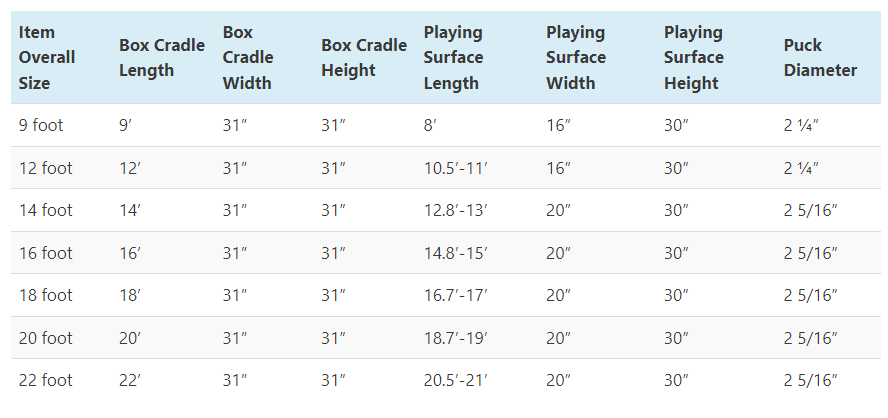 Shuffleboard Table Sizes
The playing surface needs to be one solid surface, without any perceptible seam. Obviously, that’s a bit impossible to accomplish, as you can’t buy pieces of hardwood or plywood that are 21 feet long. This leaves two options, make a butcher-block style table, where the seams between separate boards will be staggered, or for tables with a playing surface under 16 feet long, but one seam in the middle of the table.
Of course, making a butcher block-style playing surface would provide a superior surface to play on, but laying up that long a surface would be difficult. It would also be necessary to plane and sand the surface exactly level and smooth, without any twist, high points, or dips.
When making the table’s playing surface out of plywood or MDF, it’s possible to make a single joint at the middle of the table. The two sections should be cut per the table above, and then joined together with biscuits or dowels. For further strength, a board should be scabbed across the joint, reinforcing the bottom side, and screwed to both pieces.
With the playing surface assembled, sand it, paying special attention to the joint, ensuring that there is no ridge in either direction. Then stain or paint the surface. If you stain it, cover it with several layers of polyurethane varnish, sanding between coats. For paint, you are better off using an oil-based paint, with an additive like Penetrol to reduce the brushstrokes in the finish and provide a smoother finish.
The lines above should be painted or marked with a permanent marker on the shuffleboard table’s playing surface. Once dry, more varnish can be applied over this marking, to seal it and prevent it from rubbing off.
The main purpose of the table is to hold the above-mentioned playing surface, as well as to catch any pucks that fly off the playing surface. For this reason, it is customary to build the walls of the table a few inches taller than the playing surface. You don’t want them too high, as that could make it difficult to play. On the other hand, if their standards aren’t high enough, they won’t accomplish much.
The sides of the tabletop can be made of the equivalent of a 1”x 6” or 2”x 6” board. The corners can either be mitered or lapped, as you prefer. The main thing here is to make sure that the corners are exactly square, so as to provide a nice-looking table.
If your table is long enough that you can’t make the sides out of a single length of the board, it would be best to laminate layers of thinner wood together, so that you can have the necessary strength. There really is no way of strengthening the sides, without making it obvious, unless you laminate two layers together, with staggered seams.
With the outer frame built, attach 1”x 2” or 2”x 2” supports across the bottom of the frame, one foot apart. You will need the same supports at the ends as well. These supports will serve both to hold the sides a consistent distance apart and provide you with something to attach the table bottom to. Nailing through the sides with finished nails is the easiest way to attach these. Then sink the nail heads and fill the resulting holes.
These supports are meant to hold the bottom of your table, which can be made of ½” thick plywood. Cut it to fit tight, then glue and screw it to the supports, being sure to countersink the screw heads, so that they are below flush. Once assembled, fill the screw heads and any other blemishes with wood putty, allow to dry and sand smooth.
While it is possible to simply paint the inside of your table, you’re better off covering it with carpet. This will reduce the noise caused by pucks that go off the playing surface. But before installing the carpet, stain, and varnish or paint the outside of the tabletop, as well as the top edge.
A tight-knit carpet is best used for covering the inside of the table, cushioning the puck hits, and reducing noise. A carpet with a built-in foam pad is not needed. The pieces for this need to be cut and glued to the inside of the box with normal carpet adhesive. Taping the top edge of the table with masking tape, to protect it from the adhesive is a smart idea. That tape can be removed after the carpet is installed.
I find it most effective to cut my carpet pieces oversize, at least for the sides. The bottom piece will have to be trimmed to the exact width, then glued in place. Cutting the side pieces slightly wide, then gluing them in place, allows you to use the sides of the table as a cutting guide. This ensures that the edge of the carpet aligns perfectly with the edges of the table.
You may or may not desire to install legs on your table. Some people prefer having a table that is more portable, which they can set on an existing table or fold up. However, if you do this, you will need to level it every time. If you install legs, it would be a good idea to add adjustable levelers on them. This would be This way, you can level the table wherever you are planning to use it.
The tabletop should be installed, centered, inside the tabletop. It is a smart idea to install this with climatic adjusters so that you can make the necessary adjustments to the playing surface. This will accommodate changes in the climate, specifically changes in the humidity, which will affect the wood’s overall dimensions. Most shuffleboard tables will have from four to six adjusters mounted underneath them.